Implement Coarse-Grain Authorization
In this module you will implement authorization requirements. You will require a valid JWT (JSON Web Token) before a client can access the API. You will then gather a valid JWT and leverage it to make an API request.
If you want to skip this configuration section and use prebuilt objects proceed to policy binding. Keep in mind, you will have to use objects with prebuilt suffix.
Create a JWK (JSON Web Key)
In this task you will create a JWK to use for validating the JWT sent. In this lab you will use Octet and a shared secret, but options include solutions like public/private key pair as well.
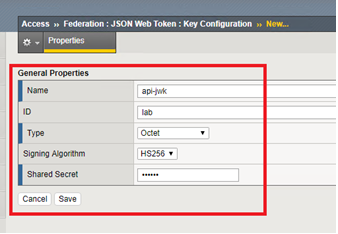
- In the BIG-IP GUI go to Access -> Federation -> JSON Web Token -> Key Configuration -> click Create
| Field | Value |
|---|---|
| Name | api-jwk |
| ID | lab |
| Type | Octet |
| Signing Algorithm | HS256 |
| Shared Secret | secret |
Create an OAuth provider
In this task you will create an OAuth provider so that you can validate a JWT created by it.
- Go to Access -> Federation -> OAuth Client/Resource Server -> Provider -> click Create
| Field | Value |
|---|---|
| Name | as-provider |
| Type | F5 |
| OpenID URI | https://as.vlab.f5demo.com/f5-oauth2/v1/.well-known/openid-configuration |
| Authentication URI | https://as.vlab.f5demo.com/f5-oauth2/v1/authorize |
| Token URI | https://as.vlab.f5demo.com/f5-oauth2/v1/token |
| Token Validation Scope URI | https://as.vlab.f5demo.com/f5-oauth2/v1/introspect |
- Click Discover next to the OpenID URI field.
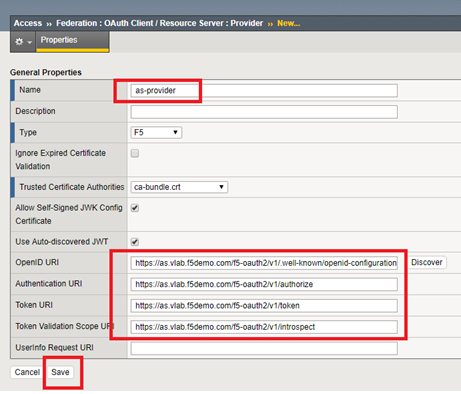
- Click Save.
Setup the Token Configuration
In this task you will adjust some of the values retrieved automatically via OIDC discover tool. This is necessary because the OIDC AS cannot provide you with the values specific to your audience.
- Go to Access -> Federation -> JSON Web Token -> Token Configuration -> Click on auto_jwt_as-provider
- Type https://api.vlab.f5demo.com into audience and click Add

- Under Additional Key add the api-jwk you just created as allowed
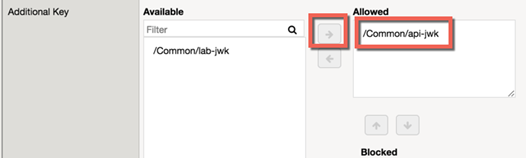
- Click Save.
Create a JWT Provider
In this task you will create a JWT provider that can be selected in a per request or per session policy for JWT validation.
- Go to Access -> Federation -> JSON Web Token -> Provider List -> Click Create
- Define a name as-jwt-provider
- Provider: Select /Common/as-provider and click Add
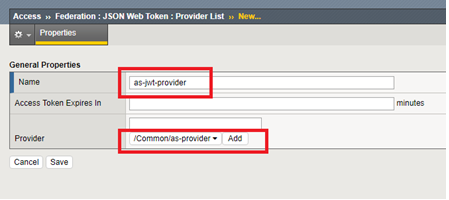
- Click Save.
Create a per session policy
In this task you will create a new per session policy to validate the JWT token and collect the claims data from parameters inside the JWT.
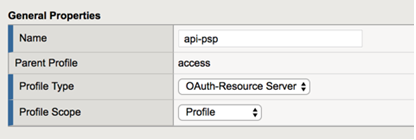
- Go to Access -> Profiles/Policies -> Access Profiles (Per-Session Policies) -> click Create
| Field | Value |
|---|---|
| Name | api-psp |
| Profile Type | OAuth-Resource Server |
| Profile Scope | Profile |
| Languages | English |
Also note that the User Identification Method is set to OAuth Token


- Click Finished
- Click Edit on the line with the new api-psp policy you just created, a new tab will open

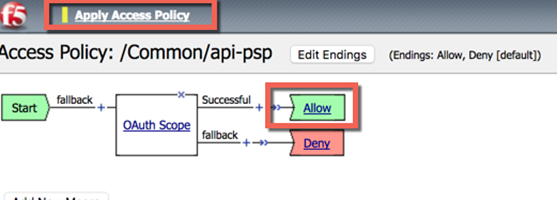
- Click the + between Start and Deny
- Select OAuth Scope from the Authentication tab and click Add Item
| Field | Value |
|---|---|
| Token Validation Mode | Internal |
| JWT Provider List | /Common/as-jwt-provider |
- Click Save
- On the successful branch click the Deny ending and change it to Allow, then Save
- Apply the policy, the final should look like this:
- Close the new tab
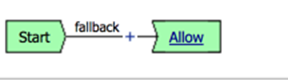
Create a per request policy
In this task you will create a per request policy to validate authorization on each request by checking for the presence and validity of a JWT.
- Go to Access -> Profiles/Policies -> Per-Request Policies -> click Create
- Define a name api-prp
- Click Finished
- Click Edit on the policy, another tab will appear
- Your policy should look like this:
It is not necessary to “Apply Policy” after work on a per request policy because it instantly applies to the next request, unlike a per session policy, which will only apply to new requests after applying.
- Close the new tab
Policy Binding
In this task you will add the policies you created to the virtual server.
- In the BIG-IP GUI go to Local Traffic -> Virtual Servers
- Click api.vlab.f5demo.com
- Change Access Profile from none to api-psp
- Change Per Request Policy from none to api-prp
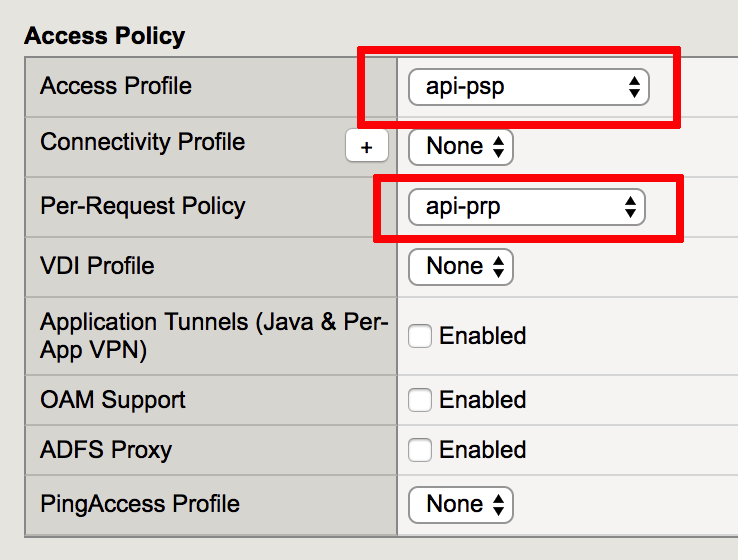
- Click Update
Test access to the API
In this task you will test your access to the API and find it is blocked because you do not present a valid JWT.
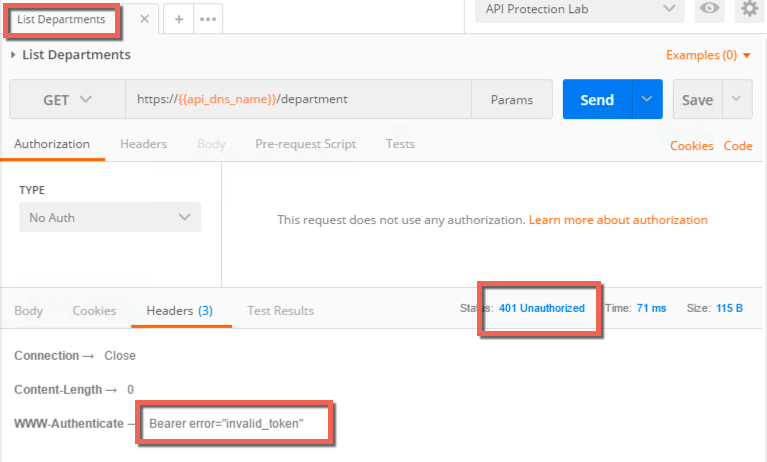
- Open Postman on the jumphost client
- Select List Departments from the HR API collection and send the request
- Review the response, note the 401 unauthorized and the header indicating you did not present a valid token
Get a JWT from the Authorization Server
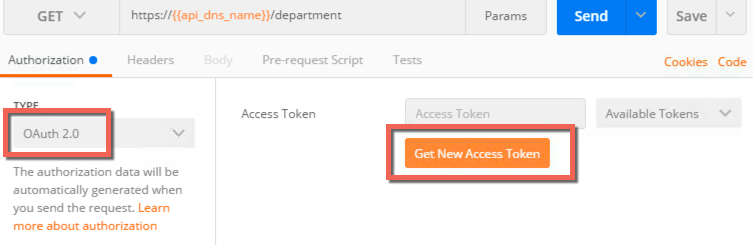
- Click the type drop down under the authorization tab
- Select OAuth 2.0
- Click Get New Access Token
Postman provides a mechanism to handle the OAuth client workflow automatically. This means it will handle getting the authorization code and then exchange it for an access token, which you will use. Without this you would make two separate requests, one to get an authorization code and another to exchange that for an access token.
- Fields should be prefilled, but verify they match the below:
| Field | Value |
|---|---|
| Token name | employeeuser |
| Grant Type | Authorization Code |
| Callback URL | https://www.getpostman.com/oauth2/callback |
| Auth URL | https://as.vlab.f5demo.com/f5-oauth2/v1/authorize |
| Access Token URL | https://as.vlab.f5demo.com/f5-oauth2/v1/token |
| Client ID | 9f1d39a8255e066b89a51f56b27506d39442c4f608c2f859 |
| Client Authenticatin | Send as Basic Auth header |
Most of this data is provided by the authorization server. The callback URL specified here is a special callback URL that the Postman client intercepts and handles rather than calling out to the getpostman.com website.
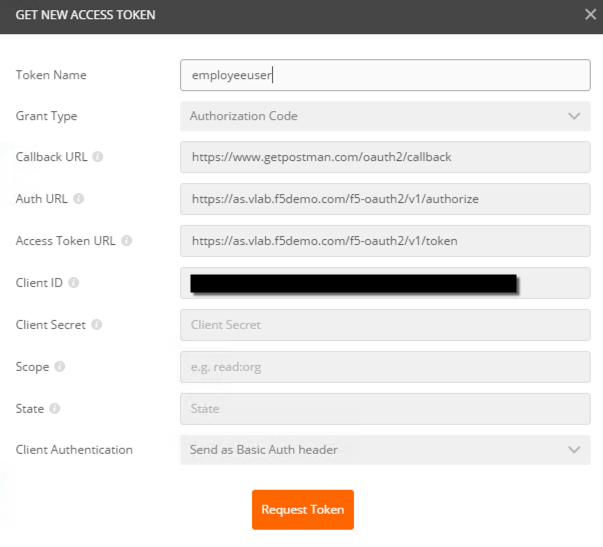
- Click Request Token
- Select employeeuser in the authentication window that pops up and click Logon
- Click the X to close this window
- Make sure employeeuser is selected under Available Tokens drop down
- Select Request Headers from the Add Authorization Data To drop down
- Click Preview Request, the result should be this:
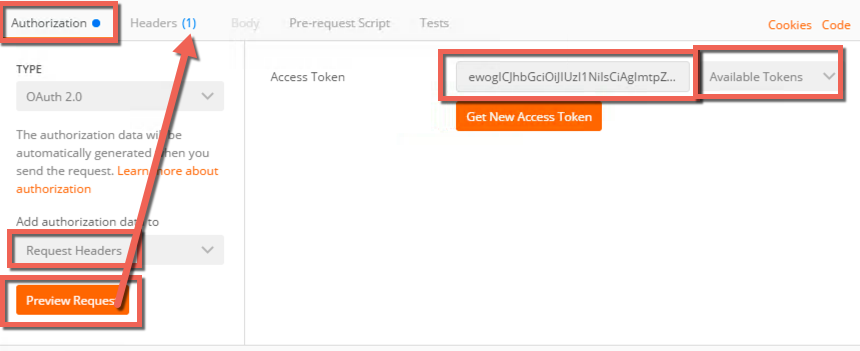
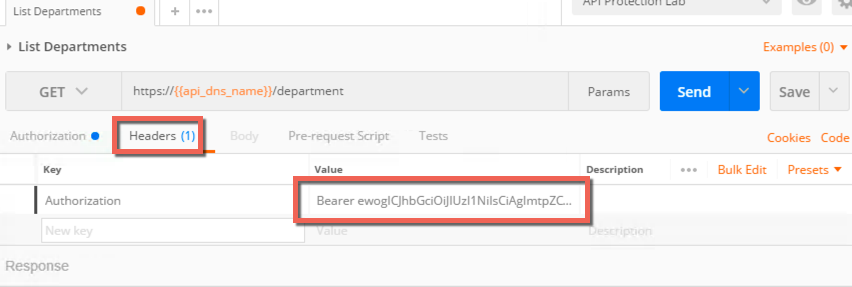
- Go to the Headers tab and review the inserted Bearer token header:
Send the request with JWT and review response
- Click Send and review the response.
- Note that now it is a 200 OK instead of 401 Unauthorized and that you have response data in the body.

You have now implemented coarse grained authorization and are requiring clients to request a JWT from a trusted authorization server before allowing access to the API.