Adding Fine-Grain Authorization
Adding Fine-Grain Authorization
In this module you will add fine-grain controls to your policy to restrict access to parts of the API based on parameters in the JWT. The example will relate to user group membership, but it could be many parameters (e.g. company, user, group, as source, etc).
The goal is to restrict access to any person’s API requests to only members of the HR department.
You can complete this lab using prebuilt objects to save time or create your own. If you are using prebuilt objects, skip ahead to policy validation.
Add URL Branching to the Per Request Policy
In this task you will add URL branching and a groups check to the per request policy
- Go to Access -> Profiles / Policies -> Per Request Policies
- Click Edit on api-prp
- Clik the + between Start and Allow
- Select the General Purpose tab
- Select URL Branching from the General Purpose tab and click Add Item
- Click the Branch Rules tab
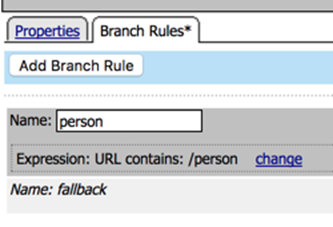
- Change the name of the branch rule from Allow to person
- Click change on the rule
- Change URL Contains from domain.com to /person
- Click Finished
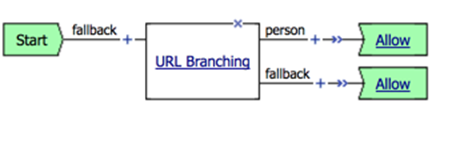
- Result should look like this:
- Click Save
- On the fallback branch change Reject to Allow. The result should look like this:
Add Groups Check to the Per Request Policy
In this task you will add a group check to the URL branch created in the last step
Click + on the person branch between URL Branching and Allow
Select Empty from the General Purpose tab and click Add Item
Change Name to “Group Check”
Click Branch Rules tab
Click Add Branch Rule
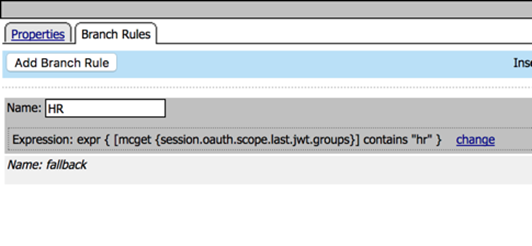
Change name to HR
Click change on the expression
Click Advanced tab
Enter the following in the advanced box:
expr { [mcget {session.oauth.scope.last.jwt.groups}] contains “hr” }
Click Finished, the result should look like this:
- Click Save
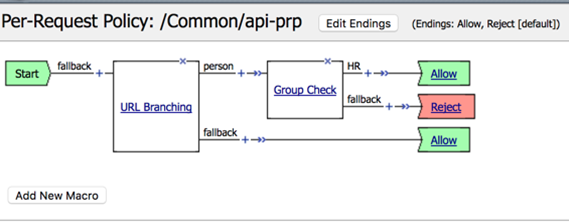
- On the branches after Group Check change the endings as follows:
- ::
HR -> Allow
Fallback -> Reject
The result should be:
Validation
In this task you will test the settings you just put in the per request policy. You are expecting to be denied access to the /person URL because employeeuser is not in the HR group that you have marked as a required value in the JWT.
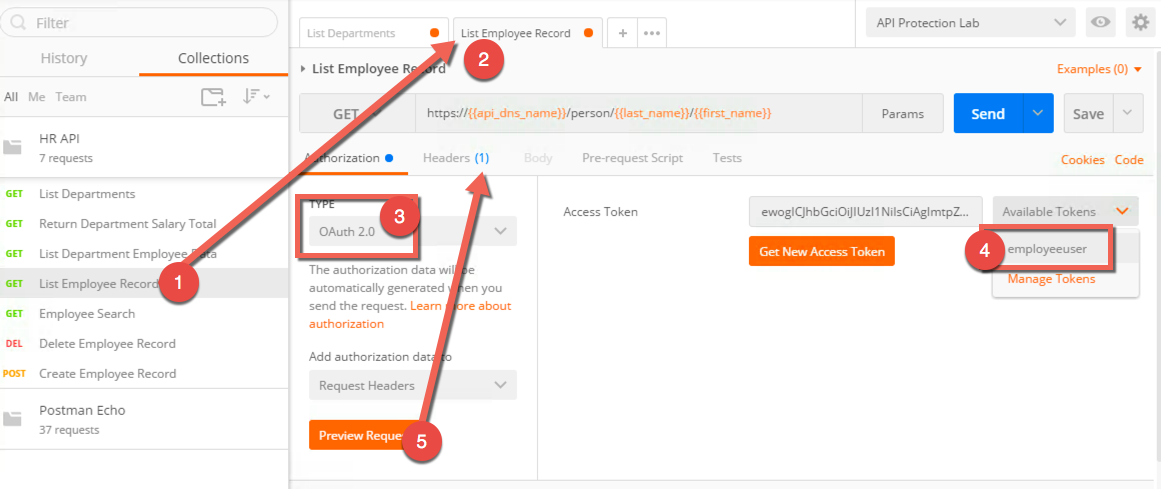
- On the left side, select List Employee Record. It will now appear in another tab in the middle section and you should select it if it is not already.
- Under Authorization type select OAuth 2.0 for the type
- From the Available Tokens drop down, select employeeuser
- Make sure Add Authorization Data is set to Request Headers
- Click Preview Request and note the header has been inserted
- Click Send
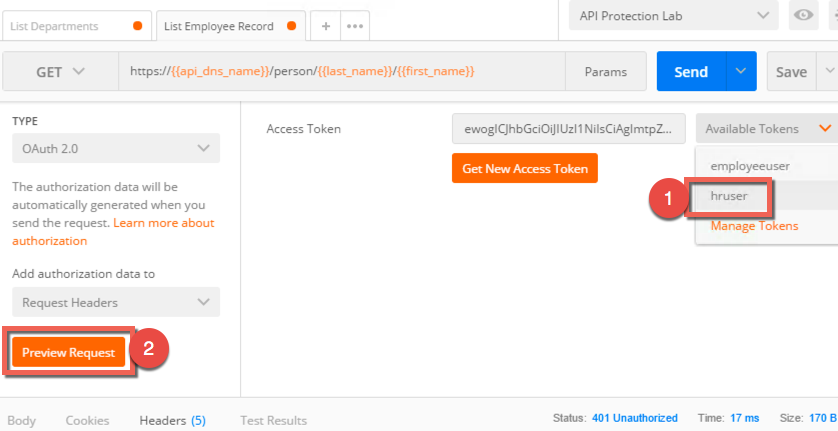
- The result should be a 401 unauthorized with no data in the body. The header will report an invalid token.

You were denied access because the JWT retrieved by this user is not allowed to access that data. We can resolve this by using credentials that will generate a JWT valid for this request.
Acquire a JWT for hruser and validate it can access /person
In this task you will get another JWT and use that to gain access to the /person portion of the API.
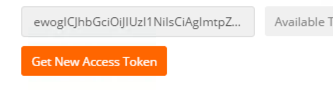
- Click Get New Access Token
- Change the token name to hruser, the rest of the settings should be already correct.
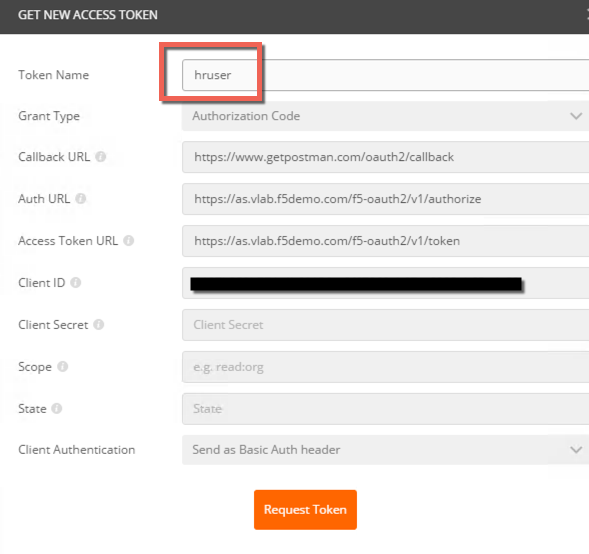
- Click Request Token
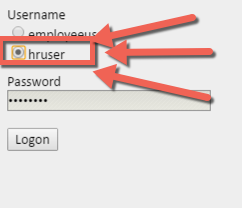
- Select hruser at the logon page and press logon.
- A JWT should be returned and your JWT management token window will look like this:
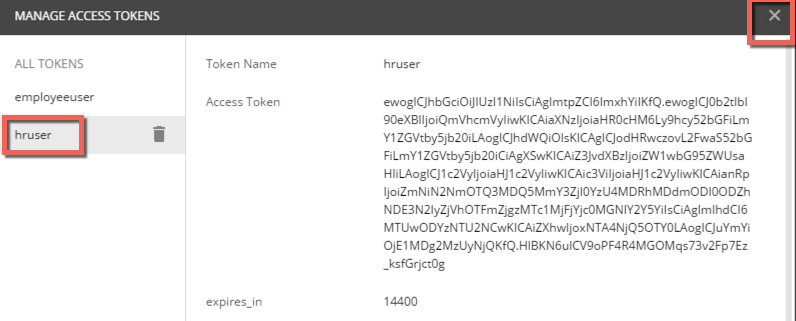
- Notice you now have two tokens, and click the X to close the window
- Select hruser from the Available Tokens drop down
- Click Preview Request
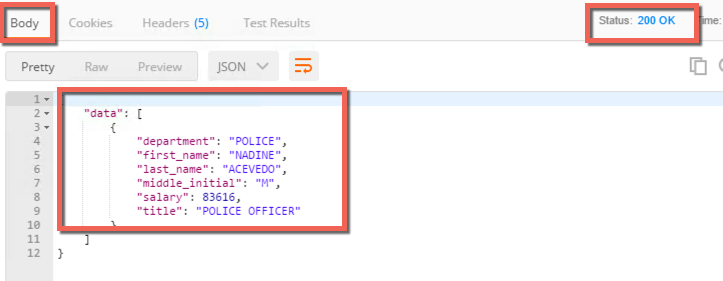
- Click Send, you should get a 200 OK response and data in the response body like this:
- You can now change the token used on any request by using this
process:
- Select the request
- Select the Authorization tab
- Select OAuth 2.0 from the type drop down menu
- Select the correct token from the Available Tokens drop down menu
- Make sure Authorization Data is set to Request Headers
- Click Preview Request to add the token to the headers
- Click Send on the request
In this module we’ve used group membership to restrict access to particular URIs, but in production you may encounter many different variations. For example, an iRule can set an APM session variable equal to the request method (e.g. GET, POST, etc) and then in the Per Request Policy you can branch on method, only allowing POST from certain users, groups, IPs, etc
JWTs are typically short lived and may or may not use refresh tokens. In this lab the JWTs have been set as valid for several hours so you will not need to get new JWTs during the lab.