Lab 3.1: Bot Protection
In this lab we’ll work with a feature called Proactive Bot Defense that uses advanced fingerprinting techniques to determine whether or not clients are legitimate browsers and block those that are not. F5 Labs (https://www.f5.com/labs) has identified that a large portion of internet traffic (in some cases more than 50%) is actually generated by bots. As a result this feature set can not only dramatically improve a web property’s security posture, but often its performance as well (by excluding illegitimate traffic).
Task 1 - Configuring Bot Defense
Browse to the BIGIP management console.
Create a new Logging profile for Bot defense by navigating to Security -> Event Logs -> Logging Profiles and clicking Create.
Configure as below and click Finished:

Navigate to Local Traffic -> Virtual Servers -> asm_vs
Click the Security Tab then click Policies
Find the BotProtection Log Profile that we just created and assign it to the virtual server by clicking the “<<” button, then clicking Update.

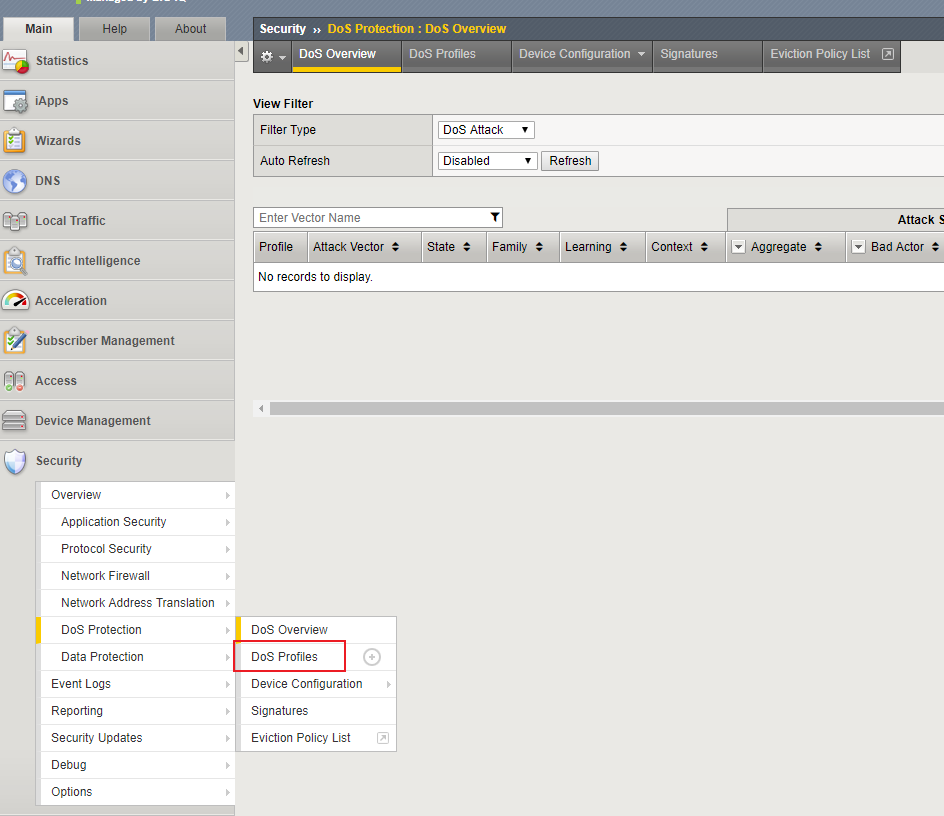
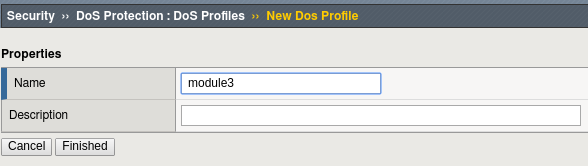
Create a DoS profile by by navigating to Security -> DoS Protection -> Dos Profiles then clicking the Create button.
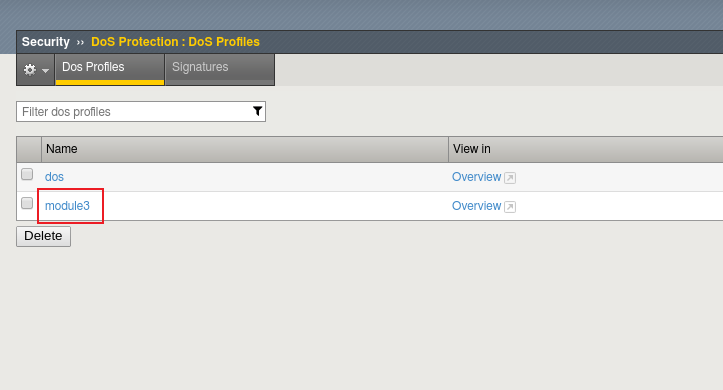
Name the profile “module3” and click Finished.
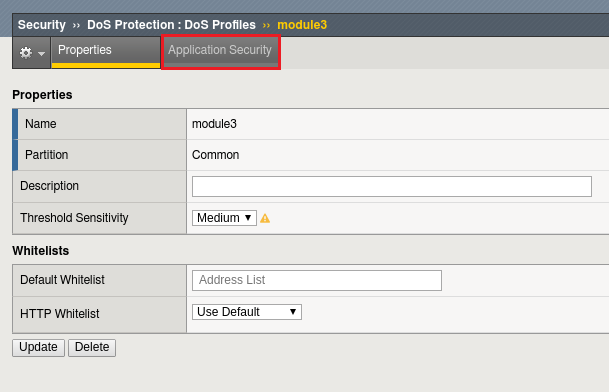
Click the profile you just created to configure it.
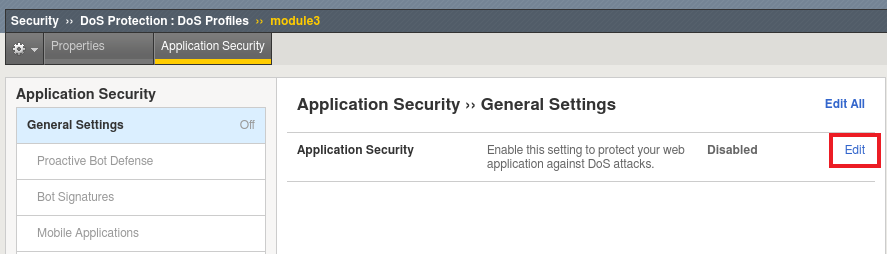
Select the Application Security tab.
Click Edit, followed by the Enabled checkbox to turn on Bot Detection.

Let’s configure the types of bot protection that offer the best bang for the buck, starting with Signatures. Click the Bot Signatures tab and click edit.
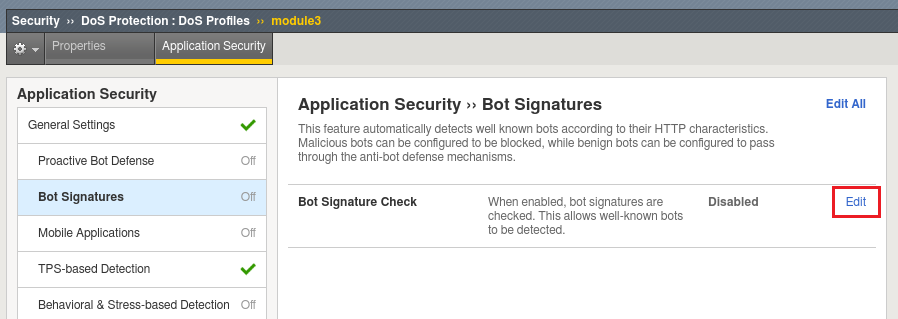
Now click the Enabled checkbox. You’ll see we can group bots by category or can select them uniquely.
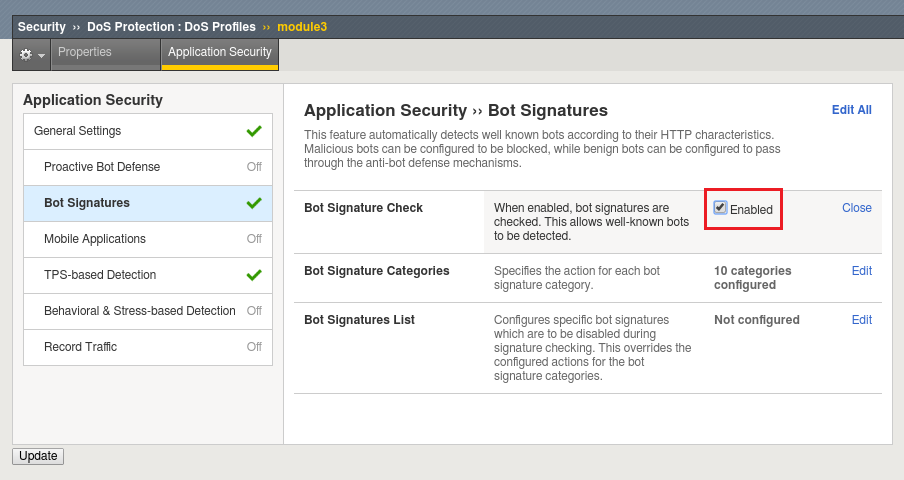
Click Edit to explore the settings further. Try to resist the urge to modify any settings until the end of the lab, the defaults will serve us well.
For complete protection, let’s go ahead and enable Proactive Bot Defense as well. Click on the Proactive Bot Defense tab, click Edit.
Change the dropdown to Always.

Change the Grace Period to 20 seconds.

Click Update to save changes.
Now let’s bind this DoS policy to a Virtual Server. Navigate to Local Traffic -> Virtual Servers -> Virtual Server List and select ‘asm_vs’.
Click on the Security tab and select Policies.
Enable the module3 DoS Protection profile.
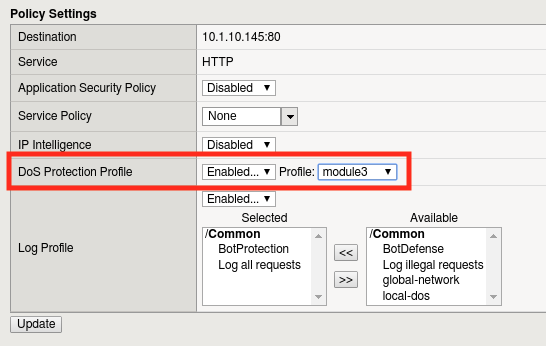
Click Update.
Note
Proactive Bot Defense and other anti-bot capabilities found in the DoS profile do not actually require an ASM policy to implement. While they are technically part of ASM, layer 7 DoS profiles are much lighter weight and execute before a security policy would.
Task 2 - Simulating Bot Traffic
Now that we have a DoS profile in place, lets test it!
Open a command prompt on your jumpbox.
Execute the following command a few times:
python /opt/goldeneye.py http://10.1.10.145/WebGoat/login -d -w 50 -s 200
Note
You’ll get errors from GoldenEye as Proactive Bot Defense takes action against it. This is expected behavior.
Wait a few minutes for traffic generation and logging.
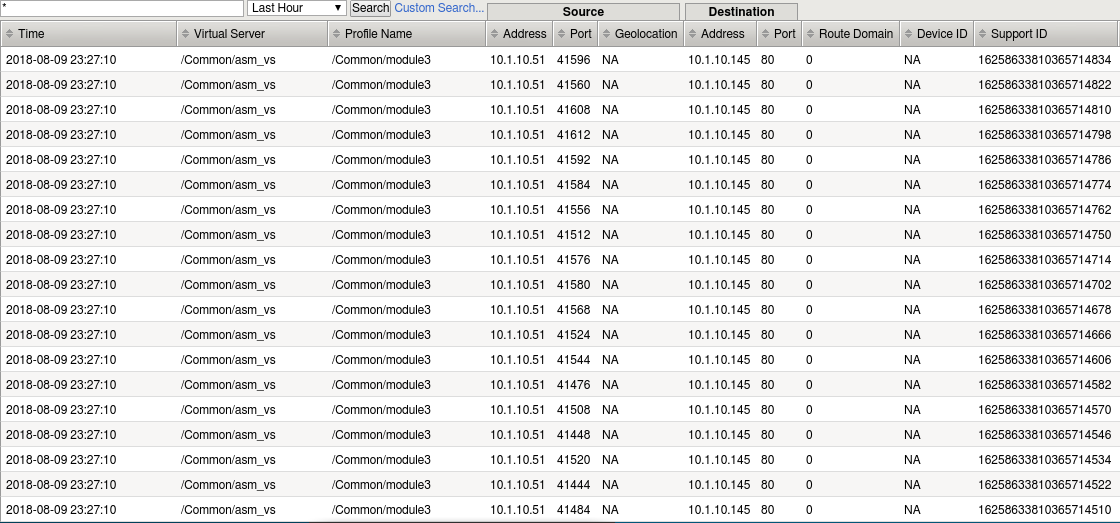
In the BIG-IP WebUI, Navigate to Security -> Event Logs -> Bot Defense -> Requests .
Review the attacks detected by ASM (hint: you’ll have to scroll all the way down to scroll right or left if you have lower resolution display).
Can you tell what action was taken and why? (hint: scroll right)
Task 3 - Custom logging with iRules
Lets say for a minute you wanted to customize your Bot Defense logging. iRules make this easy.
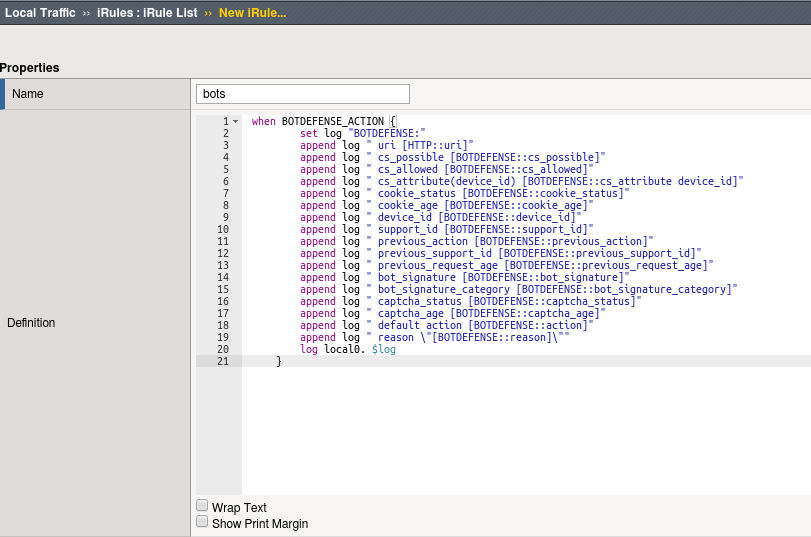
Navigate to Local Traffic -> iRules -> iRule List then click Create.
Paste the following code block into the new iRule and call it bots.
 when BOTDEFENSE_ACTION {
   set log "BOTDEFENSE:"
   append log " uri [HTTP::uri]"
   append log " cs_possible [BOTDEFENSE::cs_possible]"
   append log " cs_allowed [BOTDEFENSE::cs_allowed]"
   append log " cs_attribute(device_id) [BOTDEFENSE::cs_attribute device_id]"
   append log " cookie_status [BOTDEFENSE::cookie_status]"
   append log " cookie_age [BOTDEFENSE::cookie_age]"
   append log " device_id [BOTDEFENSE::device_id]"
   append log " support_id [BOTDEFENSE::support_id]"
   append log " previous_action [BOTDEFENSE::previous_action]"
   append log " previous_support_id [BOTDEFENSE::previous_support_id]"
   append log " previous_request_age [BOTDEFENSE::previous_request_age]"
   append log " bot_signature [BOTDEFENSE::bot_signature]"
   append log " bot_signature_category [BOTDEFENSE::bot_signature_category]"
   append log " captcha_status [BOTDEFENSE::captcha_status]"
   append log " captcha_age [BOTDEFENSE::captcha_age]"
   append log " default action [BOTDEFENSE::action]"
   append log " reason \"[BOTDEFENSE::reason]\""
   log local0.info $log
}
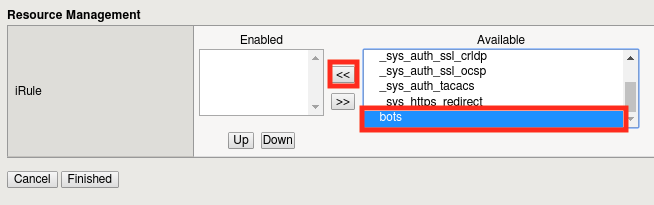
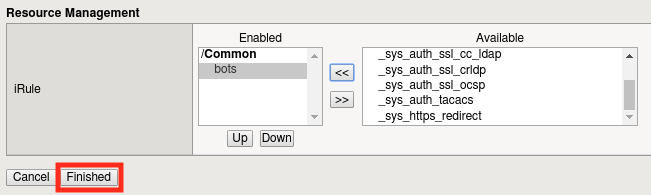
Navigate to Local Traffic -> Virtual Servers -> asm_vs and click the Resources Tab.
Click the Manage button next to iRules.

Add the iRule to the virtual server by selecting it and clicking the << button, then clicking Finished.
Launch Goldeneye again with the following command (run it a few times in a row):
python /opt/goldeneye.py http://10.1.10.145/WebGoat/login -d -w 50 -s 200
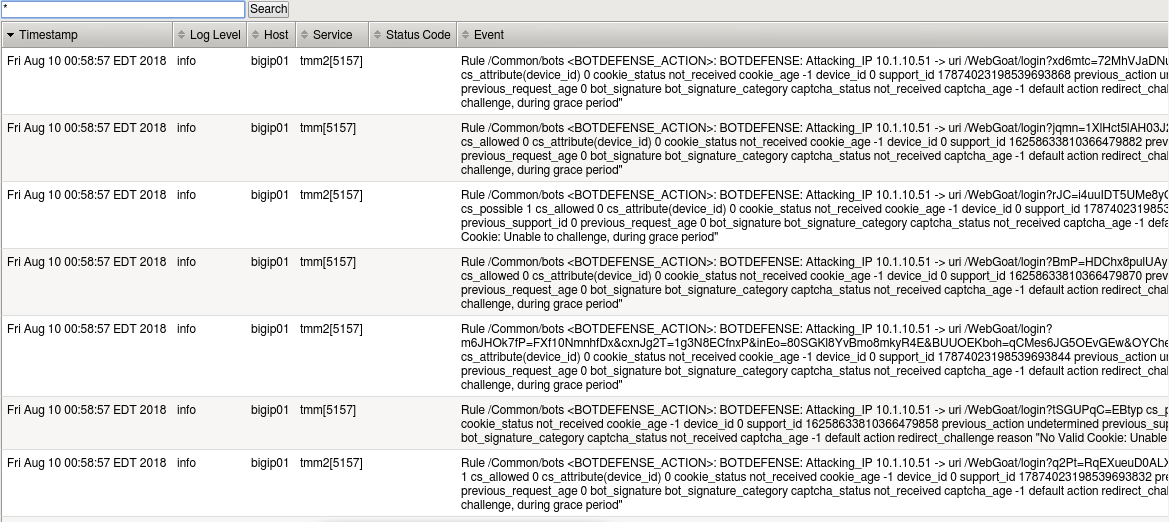
View the Local Traffic log under System -> Logs -> Local Traffic:
Now lets say we only wanted to see the attacking IP address and the reason. Modify the iRule so it looks like the one below by commenting out the lines you’re not interested in (you could also remove them):
   when BOTDEFENSE_ACTION {
    set log "BOTDEFENSE:"
    append log " Attacking_IP [IP::client_addr] ->"
    #append log " uri [HTTP::uri]"
    #append log " cs_possible [BOTDEFENSE::cs_possible]"
    #append log " cs_allowed [BOTDEFENSE::cs_allowed]"
    #append log " cs_attribute(device_id) [BOTDEFENSE::cs_attribute device_id]"
    #append log " cookie_status [BOTDEFENSE::cookie_status]"
    #append log " cookie_age [BOTDEFENSE::cookie_age]"
    #append log " device_id [BOTDEFENSE::device_id]"
    #append log " support_id [BOTDEFENSE::support_id]"
    #append log " previous_action [BOTDEFENSE::previous_action]"
    #append log " previous_support_id [BOTDEFENSE::previous_support_id]"
    #append log " previous_request_age [BOTDEFENSE::previous_request_age]"
    #append log " bot_signature [BOTDEFENSE::bot_signature]"
    #append log " bot_signature_category [BOTDEFENSE::bot_signature_category]"
    #append log " captcha_status [BOTDEFENSE::captcha_status]"
    #append log " captcha_age [BOTDEFENSE::captcha_age]"
    #append log " default action [BOTDEFENSE::action]"
    append log " reason \"[BOTDEFENSE::reason]\""
    log local0.info $log
}

Run the attack again, then refresh the logs to see the difference.
Note
These iRules could generate a lot of noise and may not be appropriate for production use without some filtering or rate limiting.
Note
In this lab we used iRules to customize Bot Defense logging, but it can also be used to modify Bot Defense behavior. For more information see
https://devcentral.f5.com/wiki/iRules.BOTDEFENSE__action.ashx.Remove the iRule and DoS Profile from the Virtual Server before you continue.
This concludes module 3.